Apelog: Building a superfast personal glossary with Ai Assistance
- Feb 3
- 5 min read
Have you ever wanted a quick, no-fuss way to jot down a new term or idea the moment you learn it? I did. Instead of drafting long documents I’d never revisit, I imagined a tiny app: enter a word, fetch a short description (editable by me), and save it as a neat card. I knew exactly what I needed, but how to build it fast? That’s where Google’s new AI-powered Antigravity came in. Antigravity isn’t just a code editor — it’s an “agentic” development platform that lets AI agents plan and execute tasks across the editor, terminal, and browser . In practice, it meant I could brainstorm the app steps with AI right in my workspace.

When I described my glossary idea in Google's Antigravity, it immediately gave me an action plan and even generated a rough draft of code. I only needed to kickstart the project. Following its suggestion, I created a new React.js app using the Vite template. In practice, that was as simple as running:
npm create vite@latest my-glossary -- --template reactThis one command spun up a React app with all the basics in place . Antigravity guided me through installing Node.js if needed and launching the development server. Within minutes, I had a bare-bones React app running locally on my computer.
Next, I tailored the React code. With Antigravity’s help, I wrote components for adding new terms and displaying a list of “cards.” Every step felt conversational: I’d describe what I wanted (“a form to enter term and description”) and the AI filled in a lot of the implementation. By the end of the session, I had a working glossary app on my own machine: I could type a term, press “Add,” and see it pop up as a card.

However, there was a catch: this only worked on my computer. Every term was saved in local state (in-browser) or maybe a local file, which meant I couldn’t access it from another device. To make it truly useful — synced across my laptop, phone, or any computer — I needed a backend database.
Setting Up a Database with Supabase
I chose Supabase to host the data. Supabase is essentially a fully managed Postgres database with instant APIs and auth built in . In a few clicks, you get a live database in the cloud. Here’s how I did it:
Create a Supabase project: I went to app.supabase.com and logged in. Then I clicked “New Project,” gave it a name, picked a region, and waited a few seconds as Supabase initialized a Postgres instance.
Add a table: Once the project was ready, I opened the Table Editor in the Supabase dashboard. I created a table (e.g. glossary) with columns like id, term, and definition. Antigravity even suggested the SQL to run, but the GUI is easy too. With a few clicks, you will be able to set it up.
Then I enabled public read access (Row-Level Security) by adding a policy that lets anyone select from this table . (Supabase documentation shows how to make data “publicly readable” with a simple policy
Insert sample data: To test, I added a couple of entries. In the Supabase UI’s Table Editor, I clicked “Insert Row” and typed in a sample term and description.
With these steps done, I had a live database online. My React app could now save and fetch glossary entries via Supabase’s API. Using the @supabase/supabase-js library, I configured the API keys in my app (Antigravity even helped me get the correct connection string). Then I replaced the local list logic with API calls: supabase.from('glossary').insert() and supabase.from('glossary').select() in my React code. Suddenly, everything I added from one device would show up on any other logged in, because it was hitting the same cloud database.

Deploying the App with Vercel
At this point, the app worked only on my machine because I was running React’s development server locally. To make it accessible to me from any other system without my mac being the server- I needed to deploy it. I decided to use Vercel for hosting. Vercel is a platform that automatically builds and hosts front-end apps. It integrates directly with GitHub so that every code push becomes a new live deployment .
Here’s what I did:
Push code to GitHub: First I created a GitHub repository (e.g. “my-glossary-app”) and pushed my local code there. Any Github Repo works, Vercel will do the rest for you.
Import into Vercel: In Vercel, I clicked “New Project” and chose my GitHub repo. Vercel detected it was a React (Vite) app and set up the build command (npm run build) and output directory (dist). I configured the environment variables with my Supabase keys (so the deployed app could talk to the database).
Deploy: With one click, Vercel started the build and deployed the site. Within a minute or two, I had a live URL. Vercel also gave me a preview URL on every future push. Now whenever I push changes, Vercel rebuilds and redeploys the app instantly.

Now, I had a fully functioning online glossary: I could add terms from any device, and students could do the same (if I gave them access).


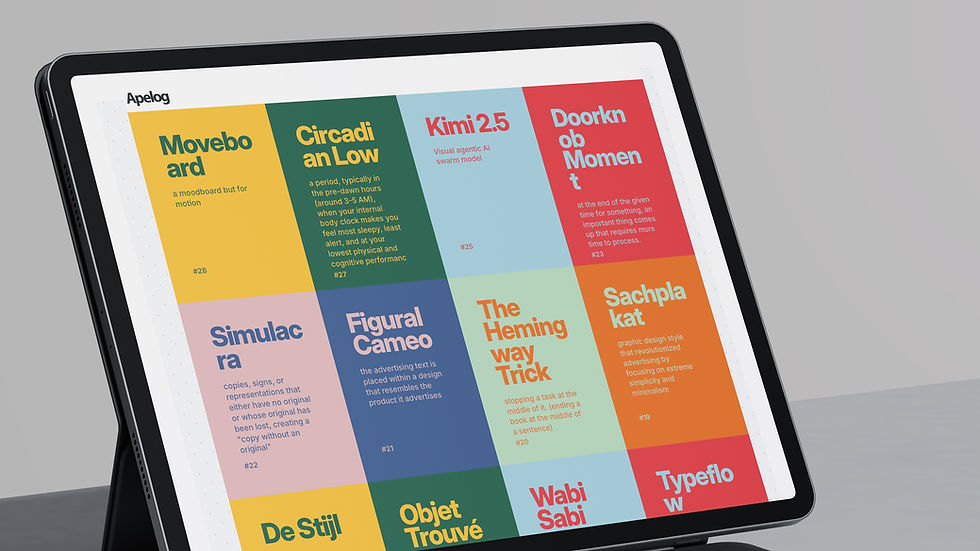
Adding a Read-Only Student Interface
With the core app live, I wanted to make something special for my students: a read-only interface that lists all the terms I’ve added, so they can browse and learn. Instead of building this from scratch, I simply asked Antigravity for help again. I told it: “Create a new page in our React app that fetches all entries from Supabase and displays them in a simple list.” It generated the code for me!
Then I mapped over terms to render each item. I styled it in a very minimal way with a colored bento-grid kinda way, so it’s easy on the eyes. Finally, I deployed this update to Vercel with another git push. Voilà — a page that my students can visit to see all the glossary entries.
Summary and Next Steps
Building this personal glossary was surprisingly fast and fun. With Antigravity as an AI coding partner, I went from idea to live app in no time. The key steps were:
Scaffold the app: Use Vite to create a React project .
Develop locally: Write React components (assisted by AI) to handle terms.
Set up Supabase: Create a new project and table in Supabase for storing terms .
Connect React to Supabase: Install the Supabase client and use it to insert/select data.
Push to GitHub: Commit code and push to a Git repo.
Deploy on Vercel: Import the repo into Vercel so every push updates the live site .
Add features: e.g. build a read-only list page for students (just another React component talking to the same database).
This was a practical, hands-on way to learn and build in public. Best of all, I’ve actually used the glossary every day since — and I’ll keep using it, because it’s mine, and it was quick to make. The combination of an AI assistant and modern cloud tools (Supabase, Vercel) turned what could have been a week-long project into an afternoon hackathon.
Thank you for reading, Mahesh Ravi.


Comments